1.Making of Bugatti Veyron

This model has has been very popular to the 3D Community so I decided to put out the tutorial / the making of Bugatti Veyron.
These are the Blueprints ( References ) for the model.


Here it Starts
Quad/Mesh Modelling is the simplest way to startup. So I began with a Quad. Basically this process involves extruding of edges and building the frame.Simple, I applied the blueprints as the viewport backgrounds and started off. Just created a quad and went on extruding the edges to get the basic shape.

The Quad which I created is nothing but a rectangular face which I had converted to an “Editable Poly”


2. cara buat katak
Now on, the model has got the basic shape and look. So coming up is only small additons…
"Male Green Frog".

I've used Maya 8 for modelling, MentalRay for rendering and Photoshop for the textures.
The goal for me was creating a photorealistic render but also a 3d model for animation purpose, without the using of ZBrush (or similar software) and without adding any kind of postwork to the final render.
The fist thing I've done is doing some reserch for good reference having in mind the final result I wanted to achieve. The bad is that I didn't find all the views of the same frog so I did a sort of "mix" of different frogs for creating the main shape.
I've started building the low poly frog starting from a simple polygon plane and I've extruded the edges following the reference pics:


I've modelled the main body leaving holes where the legs are connected.
After that I've created the legs and I've combined them to the body

As you can see from the WIP pic (4), I've built only half of the frog so that I had only half of the uv map to deal with.

Once happy with the low poly model was the time to make the uv map (5).

For the main (half) body and the leg, I've made 2 cylidrical maps, for the paws I've used 2 planar maps: 1 from top view and one from bottom view. I've used a simple checker applied to a lambert shader for checking the overall process while tweaking the uvs.
After that I've duplicated the half frog and combined all ending up with 1960 polygon, quite good for the low poly model (that can be used as a cage for the rigging/animation process).
I've than duplicated the frog keeping the low model in another layer, and I've made the higher poly version (ending up with about 30000 poly) doing a polysmooth.
Finally I've added some details using the sclupting tool (6) always trying to follow the main reference.

Using photos and hand painting (I've used a Wacom tablet) I've made the textures in Photoshop each 2048x2048 (enough though).
I've applied the texture to the frog but I've noticed (I was expecting that:P) that some texture "seams" needed to be adjusted.
I've used the built-in maya 3d paint for that, using the clone tool:)
When the color texture was made I've created the specular, bump and diffuse map from that (7,8)
I've applied the texture to the frog but I've noticed (I was expecting that:P) that some texture "seams" needed to be adjusted.
I've used the built-in maya 3d paint for that, using the clone tool:)
When the color texture was made I've created the specular, bump and diffuse map from that (7,8)


Now was the time to setting up the scene. I've created a simple plane where to place the frog over and I've rotated it about 17� (I've done that for the frog too).
For the plane texture I've used a photo made by me I've cropped it about 1300x900, and I've made also the bump (9,10)


I've created a camera and I've enabled the depth of field on that.
As you can see form the grab I've made a distance tool placing one locator in the point of focus on the model and the other locator in the camera lens. I've than parented that locator to the camera so that when I was moving the camera also the dimension value was changing (11)

Before working on lighting I've made the shader networks, one for the main frog and one for the eyeball.
After some render test I've decided to use for both cases a blinn shader with a Translucence value=1. (12)

Fot lighting setup I've used an HDRI probe and 3 lights: 1 pointlight (raytrace shadow) and 2 spotlights (13,14)


For MentalRay render settings I've used a mitchell filter with sample leve min=1 max=3, Ray tracing and FinalGather (15)

Final Result:

3.
Cara Membuat Ikan Emas Dengan 3ds Max

hello everyone!
After long break I thought to write a tutorial and here in this tutorial
we will learn how to model a fairly complex fish shape in 3ds max
version 8.0, any version can regardless follow the version is not
required.
I called this tutorial (Golden Fish) because once upon time I saw this
kind of golden fish in the movie, that is why I inspired and here I am
trying to model it, and the other side is honestly I don't have the
texture for this guy, if you really like to texture I think www.geutanyocommunity.blogspot.com has
allot of cool textures for sale you can ask them for your required
textures, I hope you will find something cool, Good Luck!
to follow this tutorial you must be intermediate user of 3ds max and familiar with the tools inside.
1-ok palls lets start, I have provided the reference /images which
is bought by one of my friends from www.lynda.com he is subscriber of
online library lynda.com, these reference /images are not for commercial
use, you can use it as your personal experience only.
2-now we will check the dimensions of the blue prints out in photoshop
to do this fire up PS and pop the 3 reference /images from reference
/images folder recently you downloaded.
3-when you done click on every single reference image respectively to
see its dimension, for example here I want to check the dimension of the
side reference, click on the reference image go to (Image>>Image
Size) or the shortcut key Alt+Ctrl+I, now the window will appear
mentioning the height and width in pixels, like here is mine (Width 820
Height 472) then we will divide these numbers to 10, for instance 820=82
and 472=47.2 when you get the exact dimensions of the /images open 3ds
max and create planes in the same dimension as we got the divided
numbers from calculator, set the reference /images like the picture
indicating below. and also group these planes plus lock their move,
scale, rotation from the motion tab under the (Link Info) button, this
will help us to protect the planes from illegal move, rotation, and
scale accidentally.

4-now create the box in same dimension as below.

5-and then set it like the image.

6-right click on the box go to its properties make it (See Through) also
make sure its pivot point is in the middle of the created box like the
picture illustrating below.

7-make the box little bit more bigger like image.

8-now convert the box into editable poly and then move the vertex according to reference image below.

9-go to left view port and start moving the vertex as below.

10-and keep moving the vertex according to reference image.

11-atlast make it like image showing below.

12-now go to polygon mode and then select the mouth polygon and then move it in X axis like image below.

13-from front view it should look like the picture below.

14-its time to adjust the guy from top view, ok go to top view and then move the vertex like the picture illustrating below.

15-now your modeled mesh should look like the image indicating below.

16-ok create a sphere and then place it inside the reference eye socket like the picture showing below.

17-select the eye polygon and then use inset tool to create the eye socket, like the image down.

18-extrude the polygon according to image bellow.

19-now the eye socket should look like the picture below from different views,

20-now from the editable poly panel scroll down to find (subdivision
surfaces) tab and then expend it now check the box called (Use NURMS
Subdivision), then move the vertex around the eye socket until you are
not satisfied, like the image below.

21-your mesh should look now something like in the image below.

22-now select all the polygons and scroll down to see button called (Slice Plane) the image below.

23-and then hit the (Slice) button, if the bounding yellow rectangular
is not in the middle of the model you can move it in XYZ axis according
to your need, like image illustrating below.

24-select the half of the model and then hit delete because we need the
exact size for the other side, yours should look like the picture
indicating below.

25-now attach the eye with body to make it the part of the model.

26-now its time to mirror, use the mirror tool to create the other side like the image below.

27-and then attach the other half of the model together, don't worry
about the gap we will adjust it later in few seconds, the picture is
illustrating below.

28-select all the polygons on the new created side and then move it to fix the edges with each other.

29-now select the middle edges of the model like the picture below.

30-and then (Weld) the edges together, here is mine with mesh smooth one below.

31-now its time to create the dorsal fan, in perspective view select the indicated 4 edges below.

32-and then extrude it some thing like the image below.

33-extrude it 2 more times in the same dimension you did with starting, and now yours should look something like in the picture.

34-go vertex and then start adjusting the vertex according to reference image below.

35-also we need the dorsal fan should be lie the reference image in the
size, scroll down to (Subdivision Surface) Tab and then check the check
box called (Use NURMS Subdivision) again and set its iterations to (2)
to get smoother result, ok now keep moving the vertex and place the
vertex like in the image below.

36-now its time to create the side fans, select the polygon indicating
in image below and then scroll down little bit to find button called
(Hinge From Edge) with polygon still selected click on the button small
window will appear from the window pick the button called (Pick Hinge)
and then click on the upper edge of polygon, and now you should get the
similar result as mine below. I forgot to tell you one thing in this
point I hide the reference /images.

37-select the edge and then extrude it some thing like in the picture.

38-now select the second polygon from back side and then use the same tools with the same setting you did with first fan.

39-do the same for the other side as like the picture below.

40-with mesh smooth yours should look like the /images below.

41-and this one.

42-its time to create the tail fan, to do this go to polygon mode and
then select 2 polygons indicating in the image and then move them
slightly back to match the image below.

43-now select the up and bottom 2 polygons and then extrude them like the image.

44-go to vertex mode and then move the vertex like image below.

45-now select the 4 middle edges like the image.

46-then extrude them 3 times with the same setting as image below.

47-now use the (Use NURMS Subdivision) in front view port move the vertex to achieve the shape same as image below.

48-last setup its time to create the guy mouth, ok adjust the vertex
some thing like image below and then select the 4 polygons representing
the mouth area, and then slightly extrude it as the picture below.

49-and then use the (bevel) tool with same setting as image illustrating below.

50-now your overall model should look like similar or something like in the picture below.

As I said (Golden Fish) here is the final touch below, I if you like to texture the fish itself ask from www.3dtotal.com for their nice and neat cool textures with hi-res map plus hi-res clean bump materials.
or you can search web for your required textures you want, so here is the final render.
if you have any kind of suggestions, feedbacks, comments, and questions please feel free to ask me.
I hope you enjoy doing this tutorial and learned something new, keep running your practice to be wisdom 3d master
4.
 Kemudian
kita harus memilih karakter dan pergi ke memodifikasi panel dan pilih
modifier kulit maka kita klik modifier kulit terbuka pada amplop
tekan tombol Tambahkan dan pilih semua obyek berkaki dua. Kemudian
kita harus memeriksa vertex seperti yang kita lihat dalam gambar 1 (B)
Kemudian
kita harus memilih karakter dan pergi ke memodifikasi panel dan pilih
modifier kulit maka kita klik modifier kulit terbuka pada amplop
tekan tombol Tambahkan dan pilih semua obyek berkaki dua. Kemudian
kita harus memeriksa vertex seperti yang kita lihat dalam gambar 1 (B) Berkaki
dua adalah dicurangi dengan karakter. Ketika kami menghidupkan
karakter berkaki dua juga bergerak sekarang kita pilih berkaki dua dan
masuk ke panel gerak dan sederhana membuat jejak berkaki dua tetapi
ketika kita rig berkaki dua dengan karakter kita harus yakin bahwa
modus sosok berkaki dua dipilih. kita menciptakan jejak berkaki dua
untuk memeriksa berkaki dua yang dicurangi dengan karakter atau tidak
setelah kami membuat jejak berkaki dua yang kami bermain animasi dan
kita melihat berkaki dua benar-benar dicurangi dengan karakter dan
karakter bergerak seperti yang kita lihat dalam gambar 1 (C)
Berkaki
dua adalah dicurangi dengan karakter. Ketika kami menghidupkan
karakter berkaki dua juga bergerak sekarang kita pilih berkaki dua dan
masuk ke panel gerak dan sederhana membuat jejak berkaki dua tetapi
ketika kita rig berkaki dua dengan karakter kita harus yakin bahwa
modus sosok berkaki dua dipilih. kita menciptakan jejak berkaki dua
untuk memeriksa berkaki dua yang dicurangi dengan karakter atau tidak
setelah kami membuat jejak berkaki dua yang kami bermain animasi dan
kita melihat berkaki dua benar-benar dicurangi dengan karakter dan
karakter bergerak seperti yang kita lihat dalam gambar 1 (C) kita
bisa lihat sebagai berkaki dua berjalan karakter juga berjalan dengan
berkaki dua, tetapi di sini adalah satu masalah beberapa bagian dari
karakter terganggu dan sekarang kita harus mengatur node karakter.
Kami pilih karakter masuk ke panel memodifikasi kulit terbuka masuk ke
dalam amplop dan mengecek titik dan melihat bagian mana dari karakter
terganggu seperti yang kita lihat kedua kaki dan kedua lengan atas
karakter terganggu pertama kita harus memilih BIP hak anak sapi tidak
pilih dengan menekan tombol h kami betis kanan pilih dari berkaki dua
di modifier kulit dan titik betis hanya memilih lalu kita pergi ke
sifat berat dan sifat di set ke 1, tetapi juga dalam pengubah kulit
seperti yang kita lihat dalam gambar 1 (D) dan gambar 1 (E)
kita
bisa lihat sebagai berkaki dua berjalan karakter juga berjalan dengan
berkaki dua, tetapi di sini adalah satu masalah beberapa bagian dari
karakter terganggu dan sekarang kita harus mengatur node karakter.
Kami pilih karakter masuk ke panel memodifikasi kulit terbuka masuk ke
dalam amplop dan mengecek titik dan melihat bagian mana dari karakter
terganggu seperti yang kita lihat kedua kaki dan kedua lengan atas
karakter terganggu pertama kita harus memilih BIP hak anak sapi tidak
pilih dengan menekan tombol h kami betis kanan pilih dari berkaki dua
di modifier kulit dan titik betis hanya memilih lalu kita pergi ke
sifat berat dan sifat di set ke 1, tetapi juga dalam pengubah kulit
seperti yang kita lihat dalam gambar 1 (D) dan gambar 1 (E)

Kemudian kita harus memilih paha kanan lagi berkaki dua dan langkah yang sama seperti yang kita lakukan dengan betis kaki kanan. Kemudian kita harus memilih meninggalkan paha dan betis dan lagi ulangi langkah yang sama seperti yang kita lakukan dengan betis dan paha kanan. Kemudian kita pilih semua bagian dari berkaki dua dan melihat semua node memiliki sifat berat 1 jika tidak 1 maka kita harus memberikan 1 lembah semua vertex tetapi kita harus ingat 1 hal jika kita pilih lengan dan kami memberikan bobot untuk vertex tulang belakang maka simpul karakter terganggu pekerjaan ini sangat hati-hati untuk dilakukan. Kami telah melakukan semua simpul setelah melakukan semua yang kita pilih bagian berkaki dua semua dengan menekan h dan menyembunyikan semua pekerjaan kita telah selesai. Karakter berhasil dicurangi oleh berkaki dua
 .5.
.5.

- Selanjutnya box-box tersebut di Boolean agar bentuknya lebih bagus.
- Kemudian buatlah setiap dinding menjadi transparan agar proses penghisapan udara kelihatan.

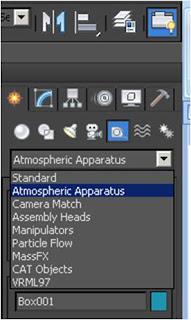
- Kemudian masuk ke menu creat lalu pilih menu helpers
- Pada menu helpers pilihlah Atmospheric Apparatus
- Pada menu ini ada tiga pilihan, kita pilih saja BoxGizmo lalu tempatkan di dalam kotak tadi
- Setelah kita buat, masih belum kelihatan apapun jika di render, kita masih butuh beberapa langkah untuk membuat udara tersebut kelihatan.
- Select Box Gizmo lalu klik menu modify
- Klik tombol ADD
- Pilih Fire Effect lalu klik OK
- Lalu akan mucul tulisan Fire Effect di bawah tombol ADD tadi
- Klik tulisan Fire Effect lalu klik tombol Setup
- Scroll kebawah lalu isi nama atmosphere effect “ Angin”

- Kemudian gantilah warna Gizmo jadi warna putih, putih agak gelap, lalu hitam

- Tekan F9 untuk melihat hasilnya
Untuk membuat animasi udara tersebut bergerak dan terhisap oleh vacum silahkan baca Artikel selanjutnya animasi penghisapan udara. Di artikel berikutnya kita juga akan belajar bagaimana udara didalam ruangan tersebut bergerak seolah ada tekanan yang membuatnya bergerak dan dibatasi oelh ruangan tersebut.
4.
Kita
harus memutuskan untuk menghidupkan karakter dalam 3d studio max cara
sederhana untuk menghidupkan karakter kita harus berkaki dua rig
dengan karakter hanya kita memiliki karakter dan perusahaan terbuka di
3d max sekarang kita harus mengatur berkaki dua dengan karakter. Kita
harus membuat berkaki dua pertama kita harus masuk ke sistem opsi
terakhir berkaki dua dan berkaki dua pilih tarik untuk karakter
tersebut dari tampilan depan seperti yang kita lihat dalam gambar 1
(A)
 Kemudian
kita harus memilih karakter dan pergi ke memodifikasi panel dan pilih
modifier kulit maka kita klik modifier kulit terbuka pada amplop
tekan tombol Tambahkan dan pilih semua obyek berkaki dua. Kemudian
kita harus memeriksa vertex seperti yang kita lihat dalam gambar 1 (B)
Kemudian
kita harus memilih karakter dan pergi ke memodifikasi panel dan pilih
modifier kulit maka kita klik modifier kulit terbuka pada amplop
tekan tombol Tambahkan dan pilih semua obyek berkaki dua. Kemudian
kita harus memeriksa vertex seperti yang kita lihat dalam gambar 1 (B) Berkaki
dua adalah dicurangi dengan karakter. Ketika kami menghidupkan
karakter berkaki dua juga bergerak sekarang kita pilih berkaki dua dan
masuk ke panel gerak dan sederhana membuat jejak berkaki dua tetapi
ketika kita rig berkaki dua dengan karakter kita harus yakin bahwa
modus sosok berkaki dua dipilih. kita menciptakan jejak berkaki dua
untuk memeriksa berkaki dua yang dicurangi dengan karakter atau tidak
setelah kami membuat jejak berkaki dua yang kami bermain animasi dan
kita melihat berkaki dua benar-benar dicurangi dengan karakter dan
karakter bergerak seperti yang kita lihat dalam gambar 1 (C)
Berkaki
dua adalah dicurangi dengan karakter. Ketika kami menghidupkan
karakter berkaki dua juga bergerak sekarang kita pilih berkaki dua dan
masuk ke panel gerak dan sederhana membuat jejak berkaki dua tetapi
ketika kita rig berkaki dua dengan karakter kita harus yakin bahwa
modus sosok berkaki dua dipilih. kita menciptakan jejak berkaki dua
untuk memeriksa berkaki dua yang dicurangi dengan karakter atau tidak
setelah kami membuat jejak berkaki dua yang kami bermain animasi dan
kita melihat berkaki dua benar-benar dicurangi dengan karakter dan
karakter bergerak seperti yang kita lihat dalam gambar 1 (C) kita
bisa lihat sebagai berkaki dua berjalan karakter juga berjalan dengan
berkaki dua, tetapi di sini adalah satu masalah beberapa bagian dari
karakter terganggu dan sekarang kita harus mengatur node karakter.
Kami pilih karakter masuk ke panel memodifikasi kulit terbuka masuk ke
dalam amplop dan mengecek titik dan melihat bagian mana dari karakter
terganggu seperti yang kita lihat kedua kaki dan kedua lengan atas
karakter terganggu pertama kita harus memilih BIP hak anak sapi tidak
pilih dengan menekan tombol h kami betis kanan pilih dari berkaki dua
di modifier kulit dan titik betis hanya memilih lalu kita pergi ke
sifat berat dan sifat di set ke 1, tetapi juga dalam pengubah kulit
seperti yang kita lihat dalam gambar 1 (D) dan gambar 1 (E)
kita
bisa lihat sebagai berkaki dua berjalan karakter juga berjalan dengan
berkaki dua, tetapi di sini adalah satu masalah beberapa bagian dari
karakter terganggu dan sekarang kita harus mengatur node karakter.
Kami pilih karakter masuk ke panel memodifikasi kulit terbuka masuk ke
dalam amplop dan mengecek titik dan melihat bagian mana dari karakter
terganggu seperti yang kita lihat kedua kaki dan kedua lengan atas
karakter terganggu pertama kita harus memilih BIP hak anak sapi tidak
pilih dengan menekan tombol h kami betis kanan pilih dari berkaki dua
di modifier kulit dan titik betis hanya memilih lalu kita pergi ke
sifat berat dan sifat di set ke 1, tetapi juga dalam pengubah kulit
seperti yang kita lihat dalam gambar 1 (D) dan gambar 1 (E)

Kemudian kita harus memilih paha kanan lagi berkaki dua dan langkah yang sama seperti yang kita lakukan dengan betis kaki kanan. Kemudian kita harus memilih meninggalkan paha dan betis dan lagi ulangi langkah yang sama seperti yang kita lakukan dengan betis dan paha kanan. Kemudian kita pilih semua bagian dari berkaki dua dan melihat semua node memiliki sifat berat 1 jika tidak 1 maka kita harus memberikan 1 lembah semua vertex tetapi kita harus ingat 1 hal jika kita pilih lengan dan kami memberikan bobot untuk vertex tulang belakang maka simpul karakter terganggu pekerjaan ini sangat hati-hati untuk dilakukan. Kami telah melakukan semua simpul setelah melakukan semua yang kita pilih bagian berkaki dua semua dengan menekan h dan menyembunyikan semua pekerjaan kita telah selesai. Karakter berhasil dicurangi oleh berkaki dua
 .5.
.5.Animasi Udara Dengan Menggunakan Gizmo Pada 3Ds Max
Animasi Udara Dengan Menggunakan Gizmo Pada 3Ds Max
Kali ini kita akan membuatkan animasi udara
dengan menggunakan Gizmo. Agar animasi kelihatan lebih menarik kita
akan buatkan kondisi udara berada di dalam sebuar ruangan tertutup.
Modeling Gizmo ini biasa juga dipakai untuk membuat objek awan. Silahkan
dibaca artikel saya yang lainya tentang membuat model awan di 3Ds Max
2013
Sebelum melanjutkan telebih dahulu saya akan beritahu spesifikasi komputer yang saya gunakan dan versi 3Ds Max yang saya gunakan.
Saya menggunakan laptop dalam membuat setiap animasi yang saya lakukan karena alat yang saya pakai sehari-hari adalah laptop kesayangan saya. Laptop saya tidak terlalu keren sih tapi dia adalah sahabat saya yang memberi saya makan dan merupakan sumber penghasilan utaman saya. Spesifikasinya adalah core2 Duo dengan prosesor 2,4GHz, Ram 4GHz dan HDD 500GB. Sedangkan untuk 3Ds Max yang saya pakai ada dua versi. Versi yang pertama adalah 3Ds Max 2013 original lho…Gak mahal kok dibanding manfaatnya yang begitu besar. Versi yang kedua saya masih pakai yang lama yaitu versi 5 sudah jadul tapi masih tetap tangguh lho…
Nah untuk membuat animasi udara kali ini saya menggunakan 3Ds Max versi 2013. Nah kalau anda punya versi dibawahnya tidak apa-apa fitirnya hampir sama kok..
Ok deh sekarang kita mulai cara membuat animasinya, ayo kita kemon…
- Langkah pertama buka 3Ds Max versi 2013 anda
- Bentuklah sebuah model ruangan tertutup yang sederhana saja dengan menggunakan box. Tidak pelu terlalu complex karena tujuan utama kita adalah membuat animasi udara, bukan ?
- Selanjutnya box-box tersebut di Boolean agar bentuknya lebih bagus.
- Kemudian buatlah setiap dinding menjadi transparan agar proses penghisapan udara kelihatan.
- Kemudian masuk ke menu creat lalu pilih menu helpers
- Pada menu helpers pilihlah Atmospheric Apparatus
- Pada menu ini ada tiga pilihan, kita pilih saja BoxGizmo lalu tempatkan di dalam kotak tadi
- Setelah kita buat, masih belum kelihatan apapun jika di render, kita masih butuh beberapa langkah untuk membuat udara tersebut kelihatan.
- Select Box Gizmo lalu klik menu modify
- Klik tombol ADD
- Pilih Fire Effect lalu klik OK
- Lalu akan mucul tulisan Fire Effect di bawah tombol ADD tadi
- Klik tulisan Fire Effect lalu klik tombol Setup
- Scroll kebawah lalu isi nama atmosphere effect “ Angin”
- Kemudian gantilah warna Gizmo jadi warna putih, putih agak gelap, lalu hitam
- Tekan F9 untuk melihat hasilnya
Untuk membuat animasi udara tersebut bergerak dan terhisap oleh vacum silahkan baca Artikel selanjutnya animasi penghisapan udara. Di artikel berikutnya kita juga akan belajar bagaimana udara didalam ruangan tersebut bergerak seolah ada tekanan yang membuatnya bergerak dan dibatasi oelh ruangan tersebut.


Tidak ada komentar:
Posting Komentar